Ages school-age
My soon-to-be first-grader is hitting the age where he's concerned about being cool. He doesn't like "baby" clothes or "baby" shows on T.V., and a few weeks ago he asked me if he could start reading "teenager" books. Slow down, buddy! I'm not quite ready for a teenager yet!
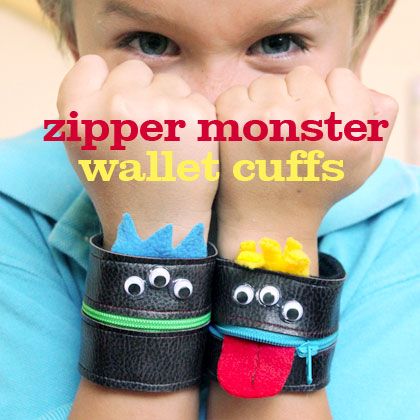
When I first thought of this project, I pictured it using brightly colored felt and fleece. But as I raided my fabric stash and gathered materials, I felt like the bright colors looked a bit, well, baby-ish. Then, I found this faux leather vinyl, which gave it just enough edge to be cool while still being fun and silly. It was a hit with my 6-going-on-16 year-old, and he especially got a kick out of the wagging tongue that can pop out. I love it because it is also practical. These wrist cuff wallets are just big enough to hold a few dollars or a bit of pocket change for things like lunch money and gumball machines.
by Marigold Haske
What you'll need
- Faux leather vinyl scraps
- Zipper
- Fleece scraps
- Felt scraps
- Wiggle eyes
- Thread
- Hot glue gun and glue
- Hook and loop fastener
How to make it
1. Cut out and prepare your materials:
Measure around your child's wrist. Add 3 inches to that measurement and cut out two strips of vinyl that are each that long and 1-inch wide. For example, if you child's wrist is 5-inches around, you will need two 8"x1" strips.
The zipper you choose should also be your child's wrist plus 3-inches. In the example above, that would be an 8-inch zipper.
Cut a rectangle of fleece that is about 1-inch longer than the length of the zipper and vinyl strips and 3" wide. (You will trim this down, so it doesn't have to be exact at this point.)
Cut out a small patch of fleece for the hair. Cut out a tongue that is 2" - 3" long.
2. Prepare your sewing machine with a zipper foot and red thread. You may want to make the stitch length just a bit longer, too.
Place one strip of vinyl flush with the side of the zipper teeth. The edges should line up at the bottom edge of the zipper (the opposite end that the zipper pull is on when the zipper is closed). Starting and ending with a few backstitches, sew one strip of vinyl next to the zipper teeth. Then, sew the second strip of vinyl next to the opposite side of the zipper teeth.
3. When you are done, it should look like the photo, with a strip of vinyl on either side of the zipper teeth.
Switch thread in your sewing machine to match the color of the vinyl and replace the zipper foot with a regular sewing foot. Sew a line down the center of the tonge piece.
4. Place your fleece backing piece wrong side up. Make sure the top edge is neatly cut. Center the tongue (right side up) and place the flat end flush along the top of the backing fleece. Place the hair piece on top of the tongue, making sure there is a seam allowance to sew.
5. Place the zipper and vinyl piece on top of the backing fleece, tongue and hair. Centering it and making sure the top edge is flush. Pin in place at the center and in a few spots along the top. Sew along the top edge. When you get near the end, with the needle still down, lift the presser foot up and turn the fabric 90 degrees. Replace the presser foot and sew along the edge. Again, needle down, presser foot up, pivot 90-degrees, presser foot down and sew along the bottom edge. Take care not to catch the tongue in the bottom edge. Pivot and sew along the final edge. Backstitch to secure.
6. Neatly trim along the edges. Sew hook and loop fasteners (such as Velcro®) along the short edges. Place the rougher "hook" side on the right side of the cuff and the softer "loop" side on the fleece backing on the opposite edge. This will make it less scratchy on your child's skin if the fastener is a bit crooked.
7. Hot glue on some wiggle eyes under the patch of hair and above the zipper "mouth." Be generous with the hot glue so that it squishes up and around the edges of the wiggle eyes. When the glue dries, you are all done!


