Total Time 1 hour Ages all-ages
Whether you want to cover your eggs with crisp, clean shapes or give them softer, tie-dye-like designs, tissue paper is an excellent medium. (Just be sure to use art tissue paper, found in art supply and craft stores; tissue used for gift wrapping is colorfast and won't leave behind any color.)
What you'll need
- Eggs
- Colorful art tissue paper, found in art supply and craft stores
- Plastic wrap
- Paper towels
- Bubble packaging
Helpful Tip:
To get the fun under way, first boil your eggs for 15 minutes and then let them cool completely. Protect your work area with newspaper and set out the supplies needed for each technique. For the methods that require a dye bath, dissolve a dab of food coloring paste in 1 cup of hot water in a mug or small bowl, then stir in cup of vinegar for each hue. (Tester's Tip: For vibrant colors, keep the dye containers in a pan of hot water set in the sink.)
How to make it
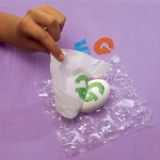
1. To create a mottled effect, lay a variety of colorful 1-inch pieces of art tissue paper on a large square of plastic wrap. Wipe an egg well with a damp paper towel to wet it, then set the egg atop the papers.
2. Wrap the plastic around the egg, gently pressing the tissue papers against it. Remove the plastic wrap and the tissue papers, then set the egg aside to dry. (Paper towel tubes cut into rings make great drying stands for finished eggs.)
3. For a specific design, such as our butterfly or monogram, wet your egg well with a damp paper towel, then lay a shape cut from the tissue paper onto the egg. (Set your egg on a piece of bubble packaging to keep it from rolling away while you work.) Gently press the damp paper towel over the tissue paper cutout.
4. Then remove the towel and the tissue to reveal the design. Repeat to add details, if you like, then allow the egg to dry.
For more Easter eggs:
How to... Make Leaf Print Eggs


