Total Time 1 to 2 hours Ages 5 to 8
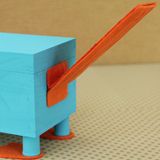
Phineas may believe that his pet platypus doesn't do much, but the truth is Perry has a very busy life - most of which he keeps undercover. Modeled after the trusty agent, this playful box is ideal for safekeeping all of your child's treasures and trinkets.
Download Agent P Treasure Box Template
by Cindy Littlefield
What you'll need
- Agent P Treasure Box Template
- Hinge-style wooden keepsake box*
- Turquoise craft paint
- Paintbrush or foam brush
- 4 wooden thread spools
- Straight pins
- Orange felt for the tail, bill, and feet (stiff felt works especially well, but regular felt will do, too)
- White and black felt scraps for the eyes (regular, stiff, or sticky-back)
- 3 pipe cleaners
- Fabric pen or marker
- Tacky glue or hot glue gun
Notes:
* You can find this style box in most large craft stores. The one shown here measures approximately 7 inches long, 4 inches wide, and 3.5 inches deep, but you can substitute one with similar dimensions. For a substantially different size box, enlarge or reduce the template pieces accordingly. Another option is to paint a cardboard box or cover it with colored paper.
How to make it
1. Paint the outside of the keepsake box and the four wooden thread spools turquoise. Let the paint dry completely.
2. Meanwhile, print the template and use it as a pattern for cutting the pieces out of the specified colors of felt.
3. For each hind foot, glue together two of the felt cutouts, one atop the other so it will be double thick. Then glue a painted thread spool atop each felt foot to create Perry's hind legs. Use the remaining two spools as they are for front legs. Glue all four legs to the bottom of the box.
4. Glue the pupils onto the eyes and attach them to the front of the box.
5. Glue the two bill pieces together, one atop the other as you did with the feet, except leave the peaked tops unglued. Spread the unglued tops apart and glue them to the box just below the eyes, as shown.
6. Create a flexible platypus tail by gluing three pipe cleaner lengths onto one of the tail pieces, as shown. Then glue the other tail piece on top, leaving a 1-inch unglued section at the base of the tail.
7. Use the marker to draw crisscross lines on the top of the tail. Then spread the unglued tabs apart and adhere them to the back of the box.


