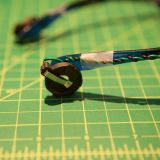
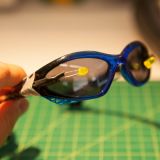
One of my earliest memories was watching Star Wars: Episode IV A New Hope in the theater with my dad and siblings. I about jumped through the roof when the lurking, hooded Jawas with yellow eyes aglow emerged out from behind the rocks and blasted R2-D2 with some kind of space taser. It's amazing to know six-plus movies and a few television shows later my children are versed in all things Star Wars and can probably re-enact that particular scene in its entirety without any rehearsals. So I set out to make some light-up glowing Jawa eyes to impress the young padawans. The picture above captures my 5 year-old's bliss at "fweaking" himself out as he puts it, by getting to actually be a Jawa. My oldest was thrilled too, but I have to admit the baby ran out of the room when he saw them on me. "Wait!" I yelled to him, "I'm your father!"
Download Glowing Star Wars Jawa Eyes Template
by Craig Mackay
What you'll need
- brown or dark adult-sized hooded sweatshirt
- scotch tape
- black electrical tape
- small needle nose pliers
- small wire cutters
- wire stripper (optional)
- 1 small pen-style soldering iron
- lead-free solder (small amount)
- 2 button cell battery CR2032 holders (3 volt)
- 2 button cell batteries CR2032 (3 volt)
- 2 yellow or white 5 mm LEDs (NOTE: Make sure the minimum voltage is 3 volts and the maximum voltage is three 3 volts or more, or this project will not work! See the notes below about changing out your power source or LEDs)
- 4 5" inch hook-up wires (gauge 26-22) or other small and compatible wires. There should be 2 wires of one color and 2 of another color to distinguish polarity (+/-)
- 1 pair of cheap sunglasses or old glasses frames
Helpful Tip:
If you decide to switch up LEDs or want to use different batteries than what I've suggested, just know if the voltage is too low, the LEDs won't light up and if the power source exceeds the max allowed voltage your LED will either not light up or burn out very quickly. You may need to add a resistor to your circuit to print high voltage down to meet your needs. Make sure to check with your local electronic parts dealer for this type of assistance assistance or research online. I found a cool site called LED Center: http://led.linear1.org/led.wiz where you can input the LED and battery voltage along with a few other technical specs found on the LED packaging. It will generate a schematic that shows you how to wiring diagram that will tell you exactly what resistor to add if any or tell you if you aren't adding enough power.
Warning: This craft is intended to be created by adults only. Many of the materials listed in this project are choking hazards and must be kept out of the reach of children. Never leave a soldering iron on when not in use and always take necessary precautions to keep out of the reach of children. Never walk away while a soldering iron is on, even when it's cooling. Always wear protective glasses when working with solder and make sure you work on a surface you expect to stay beautiful. Also, do not leave batteries in when not in use as there is no off switch. Have fun creating but above all be safe!
How to make it
1. Cut two 5" inch wires of one color and two 5" inch wires of another color.
2. If available use the optional wire strippers on each end of the cut wires to remove around 1/8"inch of insulation off the ends. If wire strippers are not available then use your wire cutters by gently squeezing them to cut the wire insulation but not the wire and without opening your grip, rotate the cutters in a circular motion and then remove the excess insulation to expose the metal wire.
3. Use the needle nose pliers to twist the metal end of each color of wire around the two metal contacts on the back of the button cell battery holder. Make note of which color is touching the contact point marked "+" for positive or "-" for negative charge. (see schematic on instructions page).
4. Once you are certain the wire and contact are touching, use a tiny bit of solder to affix the wire ends to the contact points. When all the wires are affixed wrap the newly soldered area a few times with electrical tape and then twist the wires around each other and leave about an inch on the open end not twisted.
5. Before soldering the LED to the open wire, make sure you are attaching the LED's negative(-) lead (that's the shorter of the LED's two protruding wires) with the wire color you designated as your negative wire. Repeat steps 3-5 so you have two LEDs with battery holders when you are complete.
6. Use scotch or similar tape to affix the wires to the sides of your glasses positioning the LEDs to hang right in front of the glasses lens, near your pupil. This of course may impair vision so do not drive or operate any vehicle while wearing the glasses.
7. Slide in the batteries, don your hooded sweatshirt and you are ready to sell questionable pre-owned droids on the plains of Tatooine like the Jawa you appear to be.


