I actually think these chocolate croissants are a tiny bit easier than the original recipe I shared for two reasons. First, I liked the method for making the butter square better in this recipe. I definitely struggled a lot less than I did the first time I made croissants. Also, these chocolate croissants have a rectangular shape as opposed to a crescent shape, and it doesn’t get much more simple than a rectangle. Both recipes are long, but a majority of the time involved is hands-off just waiting for the dough to chill and proof. As I mentioned the last time I made croissants, I don’t think the process is incredibly difficult as long as you take your time and go step-by-step. There’s no question in my mind the end result is worth the effort, I still think homemade croissants are one of the most delicious treats to ever emerge from my kitchen.
By Tracey
Step-by-Step Chocolate Croissants
from Baking Illustrated
Ingredients:
Dough
- 3 cups (15 oz) all-purpose flour, plus extra for rolling
- 1 tablespoon instant yeast
- 1/4 cup (1 3/4 oz) sugar
- 1 1/4 teaspoons salt
- 1 1/4 cups cold whole milk
- 2 tablespoons unsalted butter, cut into 1/2-inch pieces
Butter Square
- 3 sticks (1 1/2 cups) cold unsalted butter, cut into 1-inch pieces
- 2 tablespoons all-purpose flour
- 8 oz bittersweet chocolate, finely chopped
- 1 large egg, lightly beaten (for egg wash)
Directions:
To make the dough: In a medium bowl, whisk 2 3/4 cups of the flour with the yeast, sugar and salt. Add the milk to the bowl of a stand mixer fitted with the dough hook. Add the dry ingredients and turn to the mixer to low, beating until the dough comes together in a rough ball, about 4 minutes.

Add the pieces of butter and continue kneading until the butter is completely incorporated, about 5-6 minutes. The dough will still be sticky, but should form a rough ball and mostly clear the sides of the bowl (if you make bread regularly, this dough will be more sticky than you’re used to and won’t clear the sides of the bowl as fully as a typical yeast bread). If it’s too sticky, add the remaining 1/4 cup of flour, 1 tablespoon at a time.


Turn the dough out onto a piece of plastic wrap.
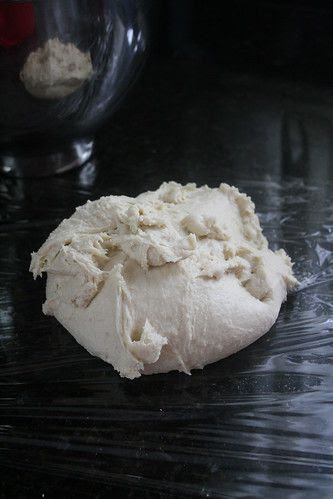
Wrap and refrigerate for 1 hour.
To make the butter square: Place the pieces of butter on your work surface and sprinkle the flour over the top of them.

Use a bench scraper to smear the butter/flour mixture back and forth against the work surface.

Continue until the mixture is uniform and smooth. Gather in a piece of plastic wrap and shape into a 7-inch square.

Refrigerate for at least 30 minutes.
Place the dough on a lightly floured work surface. Roll into an 11-inch square, lifting and turning as you go to make sure the dough isn’t sticking. Place the chilled butter square diagonally in the center of the dough.

Lift each of the four corners of the dough up and over the butter square.

It’s fine if they don’t meet exactly, just pinch them together to seal completely.

Use your rolling pin to gently tap the dough, starting in the center and going outward, until square gets larger and the butter begins to soften slightly. Roll the dough into a 14-inch square, flouring your work surface and rolling pin as necessary to ensure the dough isn’t sticking. (no idea why I chose to roll it diagonally over my parchment…)

Fold one side of the dough to the center and then bring the other side up and over it – basically, you’re folding the dough like you would a business letter. This is also called a “turn” of the dough.


Complete a second turn by folding the top half of the dough down to the center and then bringing the bottom up and over it.


Wrap the dough in plastic and refrigerate for 2 hours.

Repeat the process above (roll into a 14-inch square and fold like a business letter twice) to complete 2 more turns of the dough. Again, wrap in plastic and refrigerate for 2 hours.
Line two baking sheets with parchment paper. Place the dough on a lightly floured work surface, and roll into a 20-inch square (flour as necessary to make sure it’s not sticking). Cut the dough into 4 equal 10-inch squares.

Cut each of those squares into 3 rectangles (about 10 x 3 1/4-inches each) – you should have a total of 12 rectangles.

Add about 1 tablespoon (about 1/2-oz) of chopped chocolate to the center of each rectangle.
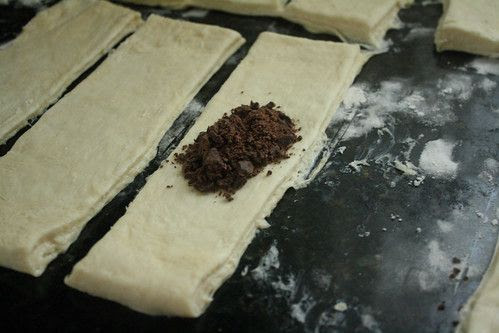
Fold the top of the rectangle over the chocolate and down to the center, then lift the bottom up and over it (again, we’re folding it like it’s a business letter).


Transfer to the prepared baking sheets, seam-side down. Try to keep the croissants horizontal as you move them so the chocolate doesn’t spill out the sides. Also, you can see on mine I have a little flap sticking out the side – that flap will get bigger as the croissants rise and puff so you can try to hide it under the croissant a little better than I did to avoid that.

Loosely cover the croissant with plastic wrap and let them rise at room temperature for 45-60 minutes, or until they’re puffy (they won’t necessarily double in size). While they’re rising, preheat oven to 400 F with racks in the top and bottom thirds of the oven.
Brush the croissants with the egg wash then bake for 18-22 minutes, or until they are golden brown, rotating the baking sheets from top to bottom and front to back at the halfway point. Transfer the baking sheets to wire racks and let the croissants cool for at least 20 minutes before serving. They’re best warm, but will keep for a few days at room temperature if tightly wrapped. I zapped mine for 15-ish seconds in the microwave on the 2nd day to enjoy it warm.
Makes 12 croissants.