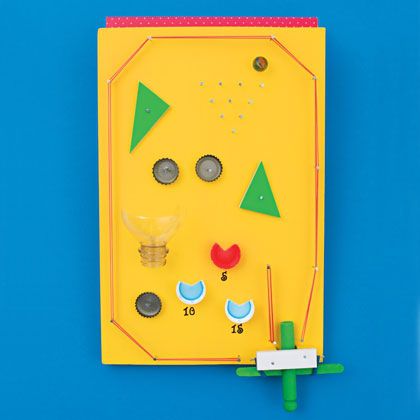
You don't have to be a pinball wizard to tackle this project. Once you've built the shooter and rubber band border, you just shoot the marble a few times to see where it tends to roll, then use recyclables and craft supplies to make the mini obstacle course.
by Catherine Newman
What you'll need
- Book or wooden block prop
- Wooden board, about 1 by 9 by 14 inches, sanded if needed
- Paint and brush
- Rubber bands
- Wire nails
- Marble
- Foam core
- Bottle tops
- Scissors or tin snips
- Glue dots
- Number stickers
- Plastic bottle
- Bottle caps
- Large nail
- Hammer
- Craft sticks
- Doll pin (available at craft stores)
- 2 (3/4-inch) wooden cubes (available at craft stores)
- Drill
- Tacky glue
How to make it
1. Paint the wooden board. When it's dry, hammer wire nails into the board and stretch rubber bands around them. The tighter the stretch, the bigger the bounce. Place this on a book or wooden block prop to keep the marble - your pinball - rolling.
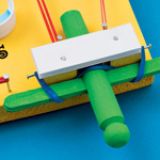
2. For the shooter, drill a pilot hole halfway through the side of a 3/4-inch wooden cube (paint it and the other materials if you like), and hammer in a wire nail, leaving 1/2 inch exposed. Repeat with a second cube. Glue the blocks to the bottom edge of the board (we used tacky glue). Nail a piece of foam core across the blocks. Wedge two craft sticks into a doll pin. Hook a rubber band on one of the nails, wrap it around the pin as shown, then hook it on the other nail. Shoot the marble a few times to see where it tends to roll, then create an obstacle course.
3. Hammer wire nails into the board to create a maze like the triangular one on our machine. Make sure the marble can fit between the nails.
4. Create spinners by cutting foam core into triangles. Paint the pieces and attach each one to the board loosely with a wire nail.
5. To make point cups, cut small sections from bottle tops with scissors or tin snips. Attach them to the board with glue dots, and label them with number stickers.
6. To make a funnel, trim a V-shaped section from the wide end of a plastic bottle. Wedge the threaded section between two wire nails on the board.
7. For bumpers that will spin when hit, make a hole in the center of each bottle cap with a large nail, then attach the caps with wire nails hammered about a quarter of the way in.


